Heartflutters 3 kolom

dinsdag 30 juli 2013

Giant Flowers rozen & tag

Hello ladies,

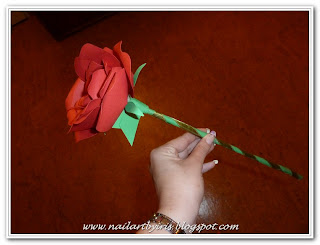
A view weeks ago I made with the cricut a bouquet for my mothers birthday!
It’s a little difficult to explane how I made them (and in English) but I’ll try.


The Flowers are from the cartridge “Giant Flowers”.
I cut them out on 4 inch and follow the instructions from the little book.
Then I used some sticks and rap them up in paper. (I’ve you want you can use some ribbon like I did). I’ve you done that, then you can glue the rose on the stick with hot glue. For added strength I used a little stroke of green paper and I glue it around the rose and stick.. (it looks like a leaf). 


The tag is from the cartridge “Tags bags, boxes and more” page 90, I cut the tag out on 5,25 inch. Then I used some patornpaper. The rose is from the cartridge “Rock Princess” on page 29. I cut the rose out on 2,5 inch. Finally I used some rhinestones and glossy accent. 

donderdag 30 mei 2013

Nail art black and purple glitters

Hello ladies,,

Here is the nailart as promise in purple glitters!
I really love this nail art and it looks so different only using a different glittercolor.
As promise I made a little movie from this nail art.


My sweet followers I want to announce that you can follow me on facebook as well..
https://www.facebook.com/NailArtByIris
This is the link to my FB page and you can find the link in the right upper corner.


All right, now how it’s done.
  • At first I used my ‘trind nail repair natural’.
  • If this is dry I made a black French manicure accept one finger (you choose witch one) this one you make totally black (i chose the ring finger).
  • Now I use ‘the best glue ever’, on the French manicure I do only the tips so you still can see a little black line. On the finger that’s all black I make in the middle a big stroke with on the sides a little black line. Wait on till the glue dry’s a bid.
  • So now you choose the glitter color you like (I picked purple) and put the glitter over the glue so it will stick on the nail.
  • After that I used topcote (3 ore 4 times on till you don’t feel the glitter).
  • If the last cote of you’re topcote is still wet, you can put some rhinestones on it. I used five in a half a circle. Another topcote will seal it and you’re done!


So now you've got another beautiful nailart design!
I've you want to see how you make this nailart, you can click on the movie below. Please subscribe on my youtubechannel :D


I love comments and followers! I've you have questions please ask them, I'll try to answer them
xxxx Iris

vrijdag 10 mei 2013

Blue card with a dog

Hello Lady's,


All right than, I've made a new card with a dog.
I'm going to try explain it but I don't remember it exactly.


The base card is a blue color (13,5 cm by 13,5 cm), on top of that I used a darker blue color  (13 cm by 13 cm) and on top of that I used a patron paper (12,5 cm by 12,5 cm).

Then I used from the cartridge “Paper Lace” blz 23 lace 2 Shadow and I guess the green paper is cut out on 4 inch (but I don’t know for sure). The patron green paper should be cut out on 3,75inch, I think.


The 2 dogs are from the cartridge “Nate’s ABCs” page 27 (the dog that’s walks) and page 40 (the dog with the leach). I don’t know the size from the dogs I guess the big dog is around 2 ore 2,5 inch and the little dog could be 1 ore 1,75 inch.

At last I finished it with a ribbon and rhinestones.

dinsdag 7 mei 2013

Card with a Swan for Mother's Day.

Hello Lady's,

Today I made a card for Mothersday.
I’m going to try to explain it in English.

Here is my project:


The basic card is in a green color. Then I made 2 strokes out of cream color, one is 13 cm by 5 cm and the second is 13 cm by 7 cm. I did the same with the patron paper only the size is 12,5 cm by 4,5 cm and the second is 12,5 cm by 6,5 cm.

Then I used the cartridge “Art Philosophy” and on page 42 you can find the oval. I cut the green oval out on 2,75 inch and the black oval is cut out on 3 inch. I embossed the smaller oval with “Swissdots” and I put glitter on the little dots.


The Swan that I used from the cartridge “Art Nouveau” on page 64 is cut out on 2 inch. I used a flower from the cartridge “Flower Shoppe” page 16. This flower is cut out on 1,5 inch and 1,25 inch.


vrijdag 19 april 2013

Nail Art Black and blue glitters

Hello ladies,,

I’m trying to write in English. Sorry if it is grammatical not correct.

This time I’ve made a new design and I’m inspired by http://simicutza.blogspot.nl/
I’ve you look at her page you will find 3 foto’s what looks like mine design.
I combined those 3 designs and than you’ve get the design I made.

I really love this design because it’s so sparkly and I’ll make this again with a different glitter color (I think pink ore purple glitter). I hoop you love it like I do. Let me know what you think. I will try to make a little movie from the nex tutorial with the purple/pink glitters.


All right, now how it’s done.
  • At first I used my ‘trind nail repair natural’.
  • If this is dry I made a black French manicure accept one finger (you chose witch one) this one you make totally black.
  • Now I use ‘the best glue ever’, on the French manicure I do only the tips so you still can see a little black line. On the finger that’s all black I make in the middle a big stroke with on the sides a little black. Wait on till the glue dry’s a bid.
  • So now the fun part gets starting. The glitters!!!!!! Choose the color you like (I picked blue) and put the glitter over the glue so it will stick on.
  • After that I used topcote (3 ore 4 times on till you don’t feel the glitter).
  • If the last cote of you’re topcote is still wet, you can put some rhinestones on it. I used five in a half a circle. Another topcote will seal it and you’re done!


 I've made one blurred fotograph so you can see how sparkly the glitters are. 


It’s so sparkly I LOVE IT!
I hope you love it to.
Let me know what you think about it.
And let me know if you want to see more English posts and I hoop my English is good enough to read and understanding it.


I always love comments and followers!
I’ve you follow me let me know I’ll follow you to

Xxx Iris


donderdag 11 april 2013

Nail art green with kittens

Hallo dames,

Ik heb een nail art gemaakt met een poesje!
Het is niet moeilijk om te maken. Sorry voor de foto's want ik zie dat je helaas niet duidelijk kunt zien wat erop staat. Het was avond toen ik ze maakte en de dag erna waren we weg waardoor ik vergeten ben om er nog een paar te maken. Ik hoop dat jullie toch het idee snappen en kunnen zien hoe het eruit ziet.  


  • Als eerste een verzorgingslak en als dit goed droog is gebruik ik 'the best glue ever', alleen over de tip van de nagel. op de duim en ringvinger lak ik luk raak (met een striperkwastje om een gras effect te krijgen). De andere vingers maak ik een normale tip je kunt ervoor kiezen om dit ook met de lijm te doen of met topcote. (als je topcote gebruikt ga je alleen over de tip en je doet dan meteen glitters erover).
  • Als de lijm droog is doe je er glitters over. Ik heb een pincet gebruikt om het gras beter te accentueren.
  • Om de grofheid van de glitters weg te krijgen gebruik ik 2 tot 3 lagen topcote (anders lukt het niet zo goed om poesjes te maken).
  • Op de duim en ringvinger wil ik een poesje maken, hiervoor heb ik een dikke en een dunne dottingtool nodig. Met zwarte nagellak maak ik eerst een puntje (dit wordt het hoofdje) en daaronder een iets dikker bolletje (het buikje). Met het dunne dottingtool maak ik de oortjes en een staart.
  • Vervolgens nog 1 of 2 topcotes en je hebt een leuk resultaat.


Ik hoop dat jullie het leuk vinden.
xxx Iris


woensdag 3 april 2013

Nail art v-vorm zilver en zwart

Hallo dames,,

Vandaag heb ik een snel nailart design gemaakt. 


  • Eerst een verzorgingslak.
  • Met topcote heb ik een diagonale lijn getrokken. Hier overheen komen de zilveren glitters. 
  • Daarna maak je met de topcote een driehoekje en hierover heen komt de zwarte glitter.
  • Topcoten totdat je de glitters niet meer voelt 2 a 3keer.
  • In het midden heb ik een roze steentje geplaatst op alle nagels  (dit hoeft niet).
  • nog een keer topcoten en dan ben je klaar.


I hoop you like it!!
I've you have a idea for me about what you love to see on my blog, i love to hear it.
I'll look i've i can try it out.
xx Iris


woensdag 20 maart 2013

Nail art blauw met zebraprint

Hallo dames,

Vandaag heb ik weer een soort zebrapatroon gemaakt.
Hieronder zien jullie een foto hoe het eruit ziet.


  • Ik zal beschrijven hoe ik dit gedaan heb.
  • Eerst maak ik gebruik van een verzorgingslak.
  • Daarna heb ik met een sponsje een laag witte nagellak aangebracht.
  • Op dezelfde manier breng ik eerst een lichtblauwe kleur aan en daarna een donkerblauwe kleur. Zorg dat je een licht blauwe laag nog kunt zien. 
  • Om de kleuren mooi in elkaar over te laten gaan breng ik eerst een topcote aan.
  • Als dit gedroogd is breng je een laag van "The best glue ever" aan en daarna kun je glitters erover heen doen. Zorg dat je daarna een topcote erover heen doet zodat je de grove glitters niet meer voelt.
  • Daarna ga ik met mijn striperkwastje zwarte strepen aanbrengen.
  • Topcoten en dit is het resultaat.


Ik hoop dat jullie het mooi vinden.
I love comments and folowers!
xx Iris

zondag 17 februari 2013

Carnavals nail art!

Hallo dames,

Ik heb natuurlijk Carnaval gevierd!
Het was super gezellig maar bij het verkleden horen natuurlijk ook carnavals nagels!
Ik ben verkleed als een bij dus er horen ook nageltjes bij met streepjes van een bij.


Wat heb ik gedaan.
  • Verzorgingslak gebruiken.
  • Als dit droog is een schuine lijn trekken met gele nagellak.
  • Vervolgens met een striperkwastje zwarte strepen maken.
  • Daanra een topcote en je kunt gaan stappen!!


Het is heel simpel om te maken en je hoeft er niet veel voor te doen!


Ik hoop dat jullie het leuk vinden.
Hebben jullie ook een leuke Carnaval gehad voor diegene die dit vieren?
xx Iris


Related Posts Plugin for WordPress, Blogger...